There are many ways to work with Git, including VS Code, the terminal, and other IDEs. This post focuses specifically on Databricks + Git.
If you are using Databricks and Git for the first time, this tutorial is for you. Many companies use Databricks for analytics, data engineering, and machine learning because it combines notebooks, scalable compute, scheduled jobs, and governed data access in one place. But even in that setup, Git is still the source of truth for code.
Databricks Repos is simply the bridge between the two. It lets you work on a Git-tracked copy of the repository inside Databricks, while GitHub remains the place where history, branches, and Pull Requests are managed.
What you will learn in this post
This guide is split into two parts.
Tutorial 1 covers the basic mechanics: cloning a repository, making a change, and committing and pushing it.
Tutorial 2 covers the real team workflow: creating your own branch, working safely, and merging changes through a Pull Request into dev.
What is a Git repository?
A Git repository is a version-controlled project folder. It stores files, tracks how those files change over time, and records who changed what and why.
That matters because teams need a way to collaborate without overwriting one another’s work. Git makes that possible by letting each person work independently, save changes in small snapshots called commits, and then merge those changes back into shared branches in a controlled way.
In practice, Git helps a team do four things well:
- work in parallel without constantly breaking shared code
- review changes before they are merged
- recover earlier versions if something goes wrong
- maintain an audit trail of decisions and edits
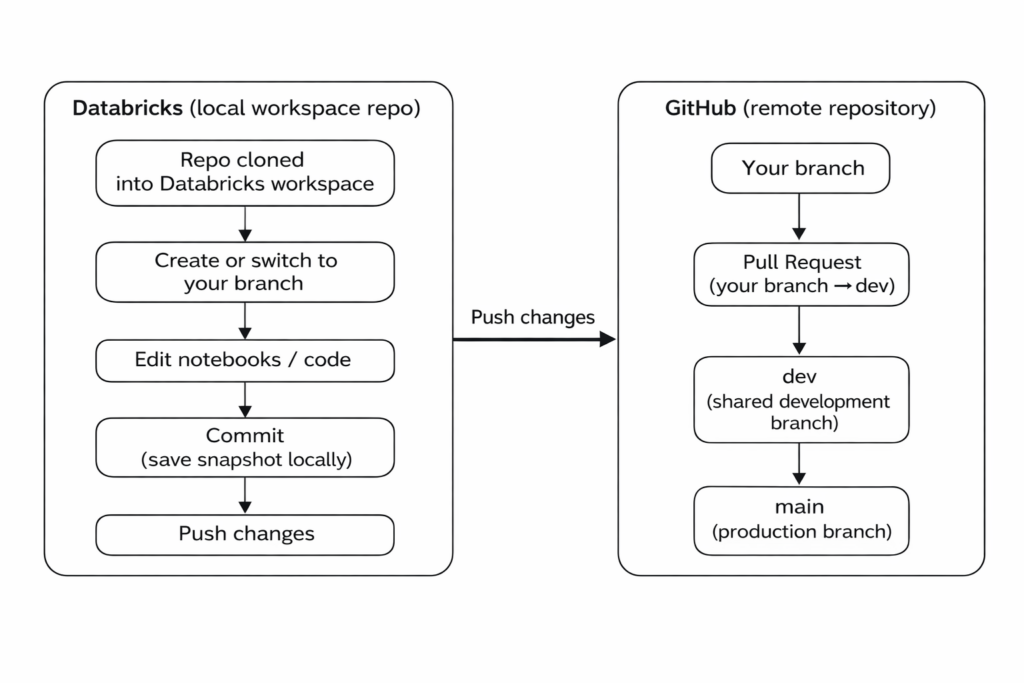
Most teams use a branching workflow. That means developers do not work directly on the stable or “main” branch. Instead, they create their own branch, make changes there, push those changes to the remote repository, and then open a Pull Request to merge them into a shared branch such as dev.
Core Git terms
| Term | Meaning |
|---|---|
| Repository | A version-controlled project directory |
| Commit | Save a snapshot of your changes |
| Branch | An independent line of development |
| Main | The stable or production branch |
| Dev | A shared integration branch used before main in many teams |
| Remote | The shared central repository, usually on GitHub |
| Clone | A local copy of the remote repository |
| Push | Send those commits to GitHub |
| Pull | Bring changes from GitHub into your working copy |
| Pull Request | Ask GitHub to merge one branch into another |
| Merge | Combine changes from one branch into another |
| Merge conflict | A situation where Git cannot automatically combine overlapping changes |
Before you start
You need:
- a Databricks workspace: sign up for a free account here
- a GitHub account: sign up for one here
- permission to access a repository
- the repository URL
Tutorial 1: The basic mechanics in Databricks Repos
The video below walks through connecting GitHub, cloning a repository, and making a first commit inside Databricks Repos.
The basic workflow is:
- Connect Databricks to GitHub
- Clone a repository into Databricks Repos
- Make a small change inside the repository
- Commit the change
- Push it to GitHub
- Now your changes are in the remote Github repository.
Tutorial 2: The workflow using branches and Pull Requests
Most teams do not allow developers to edit main or dev directly. Instead, each person works on their own branch and merges changes through a Pull Request. The typical workflow looks like this:
Step 1: Add the repository to Databricks
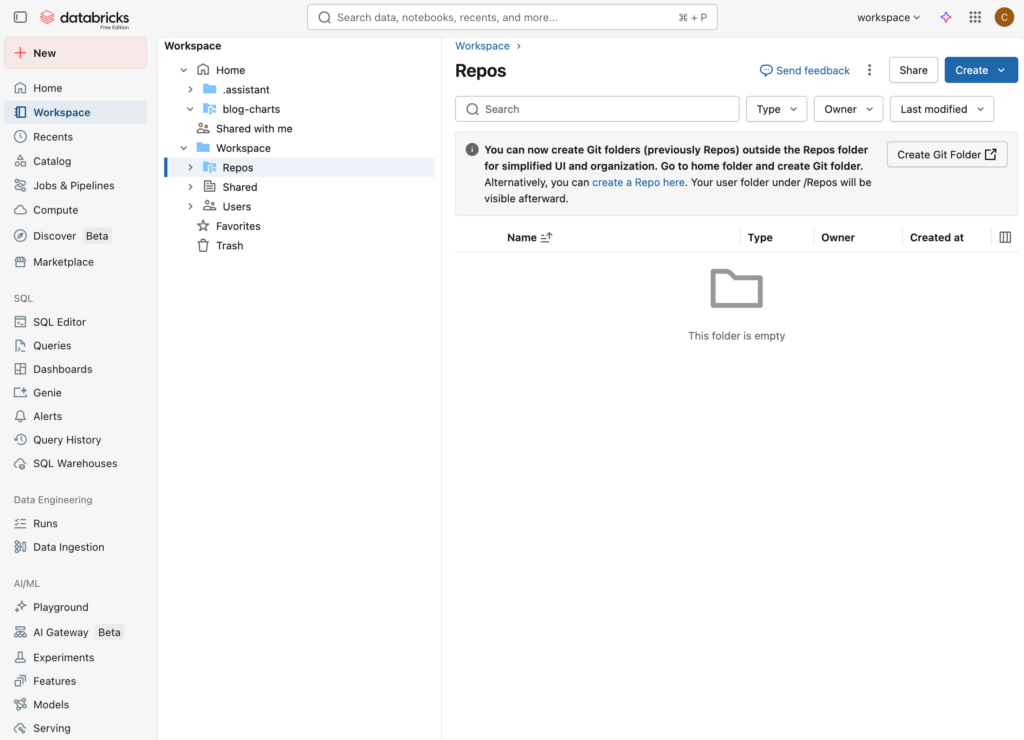
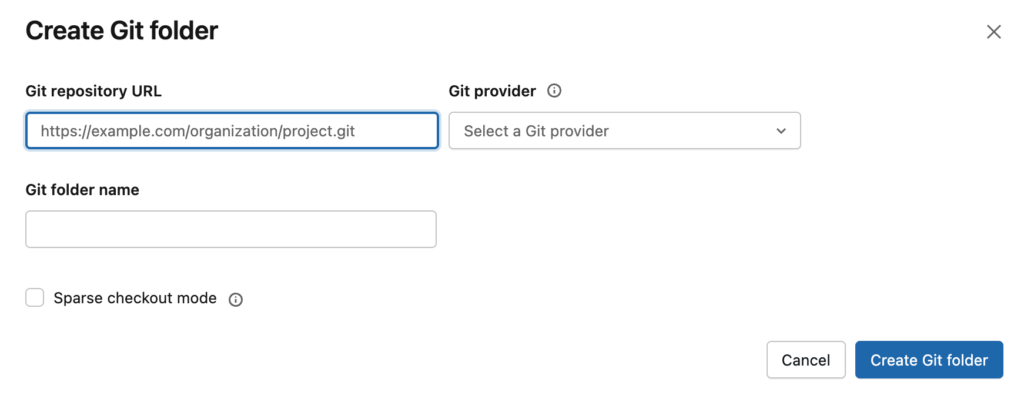
Start by adding the Git repository to Databricks as a Repo. This links Databricks to your Git provider and clones the repository into your workspace.
Once that is done, the project files will appear in Databricks and you can start editing them. Databricks is the place where you work on the code, but GitHub remains the source of truth for the repository and its history.
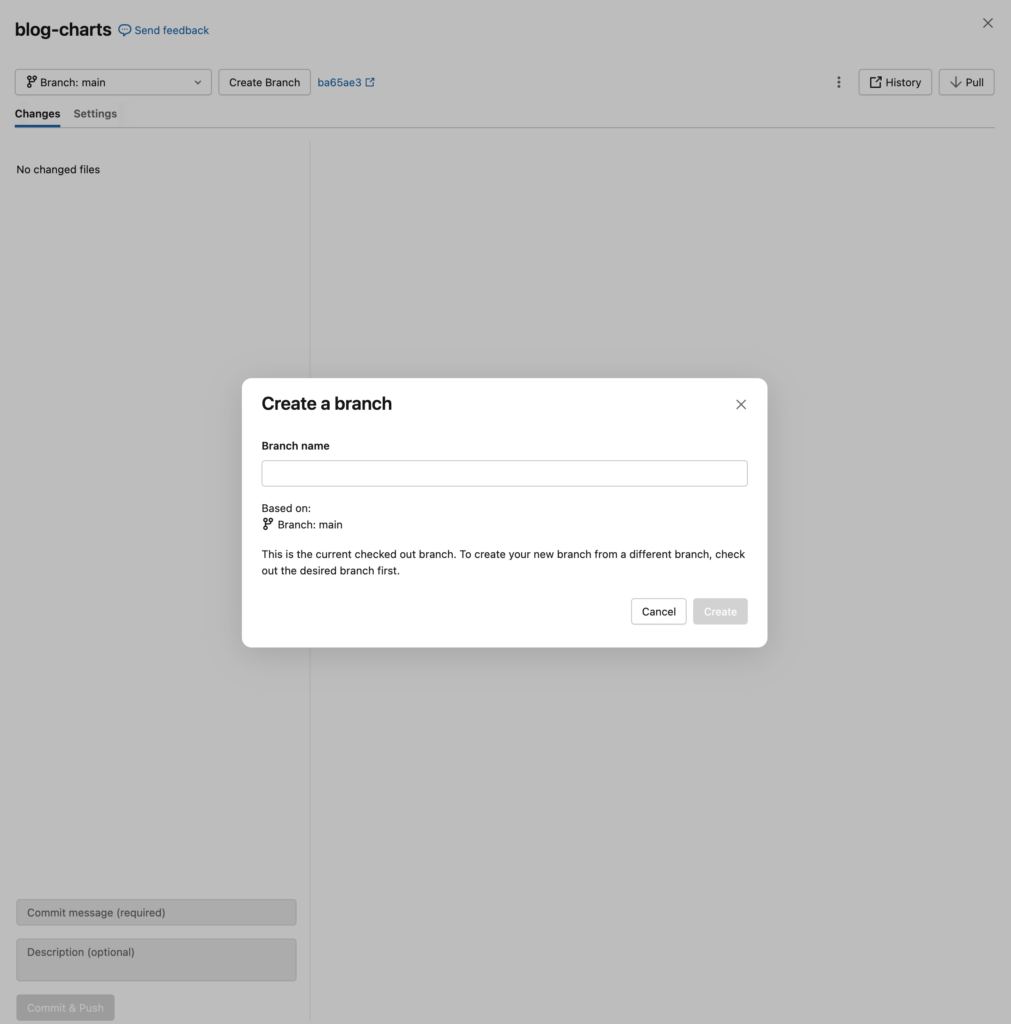
Step 2: Create your own branch
Before editing anything, create a new branch. Your branch isolates your work from the rest of the codebase.
Common naming patterns include:
firstname_lastname

feature/add-sales-model

bugfix/fix-data-join
Step 3: Make your change
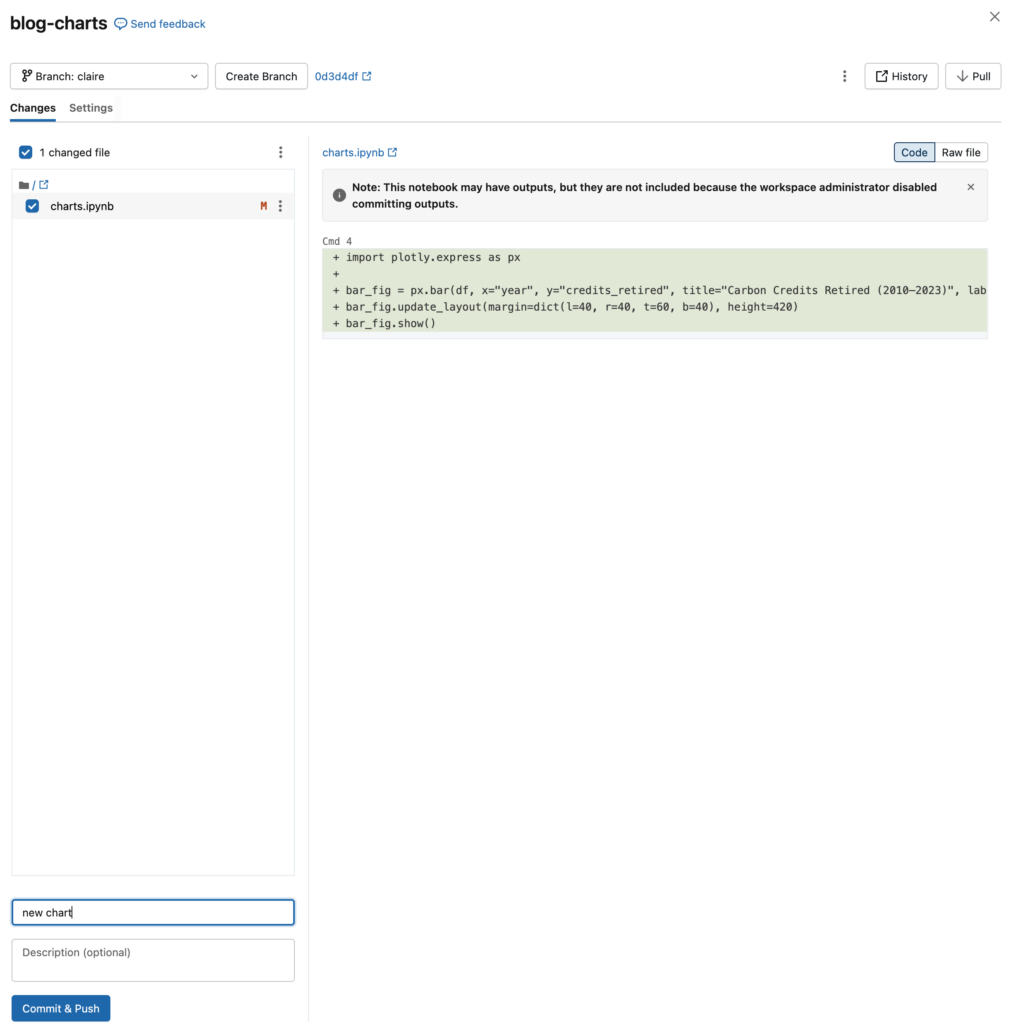
Edit or create a file inside the cloned repository. Save the change. Databricks will now show the modified file in the Git panel.
Step 4: Commit and push
Open the Git panel in Databricks. You should see your changed file listed. Add a clear commit message and select Commit & Push. This performs two operations:
Commit
- creates a snapshot of your changes
Push
- sends that snapshot to GitHub
- on the branch you are currently using
Your change is not yet part of the shared codebase. It only exists on your branch. Open GitHub in your browser and navigate to the repository.
Switch the branch selector from the default branch to your branch. You should now be able to see:
- your new file
- your latest commit
- your commit message
This step matters because it confirms the push really reached the remote repository.
Step 5: Open a Pull Request
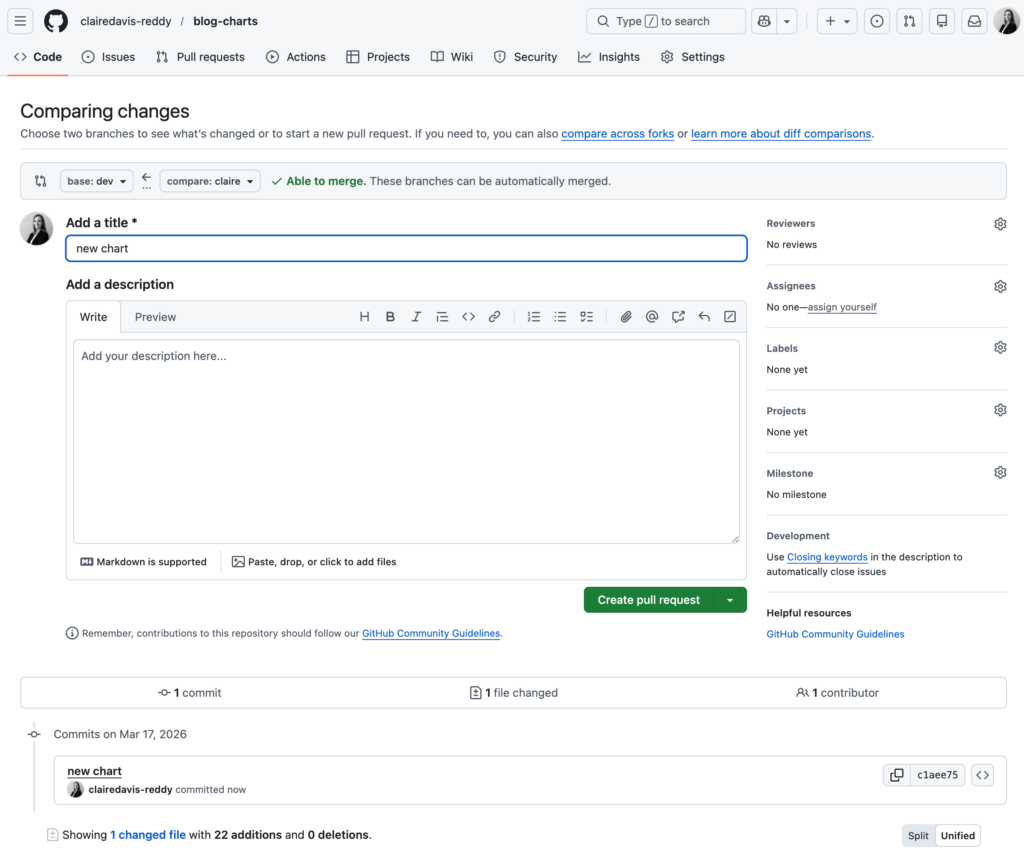
Once you have committed and pushed your changes on Databricks, the next step is to open a Pull Request in GitHub. This is the point where you ask for your branch to be merged into the shared development branch.
For this step, the branch direction should be:
- Base =
dev - Compare = your branch
That means: merge my branch into dev.
A Pull Request gives the team a controlled way to review changes before they become part of the shared codebase. Depending on your team setup, this may include code review, automated checks, or approval before the merge happens.
Once the Pull Request is merged, your changes are no longer only on your branch. They are now part of dev.
Step 6: Sync your branch with dev
While you are working, other people may also be merging changes into dev. If you do not keep your branch up to date, it can drift away from the shared codebase and become harder to merge later.
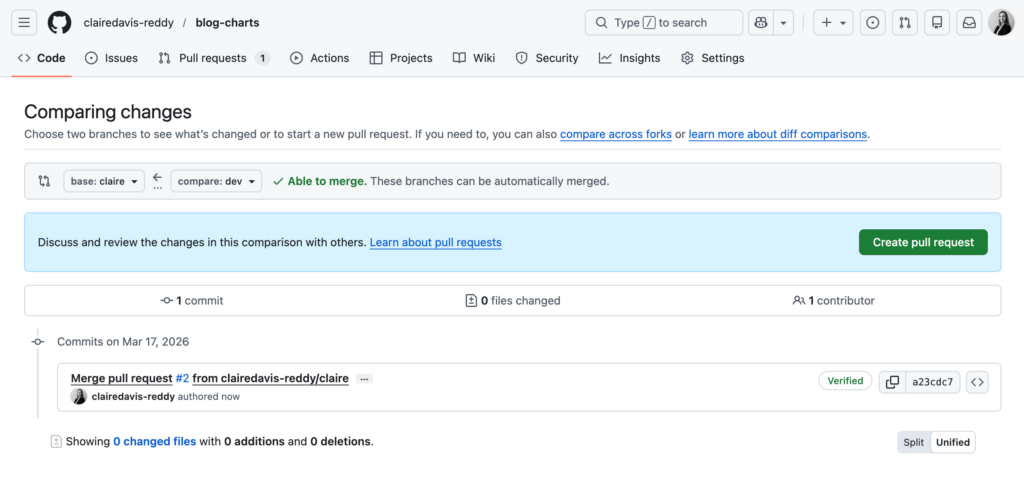
To sync your branch in this workflow:
- open GitHub
- merge the latest
devchanges into your branch - return to Databricks
- switch to your branch
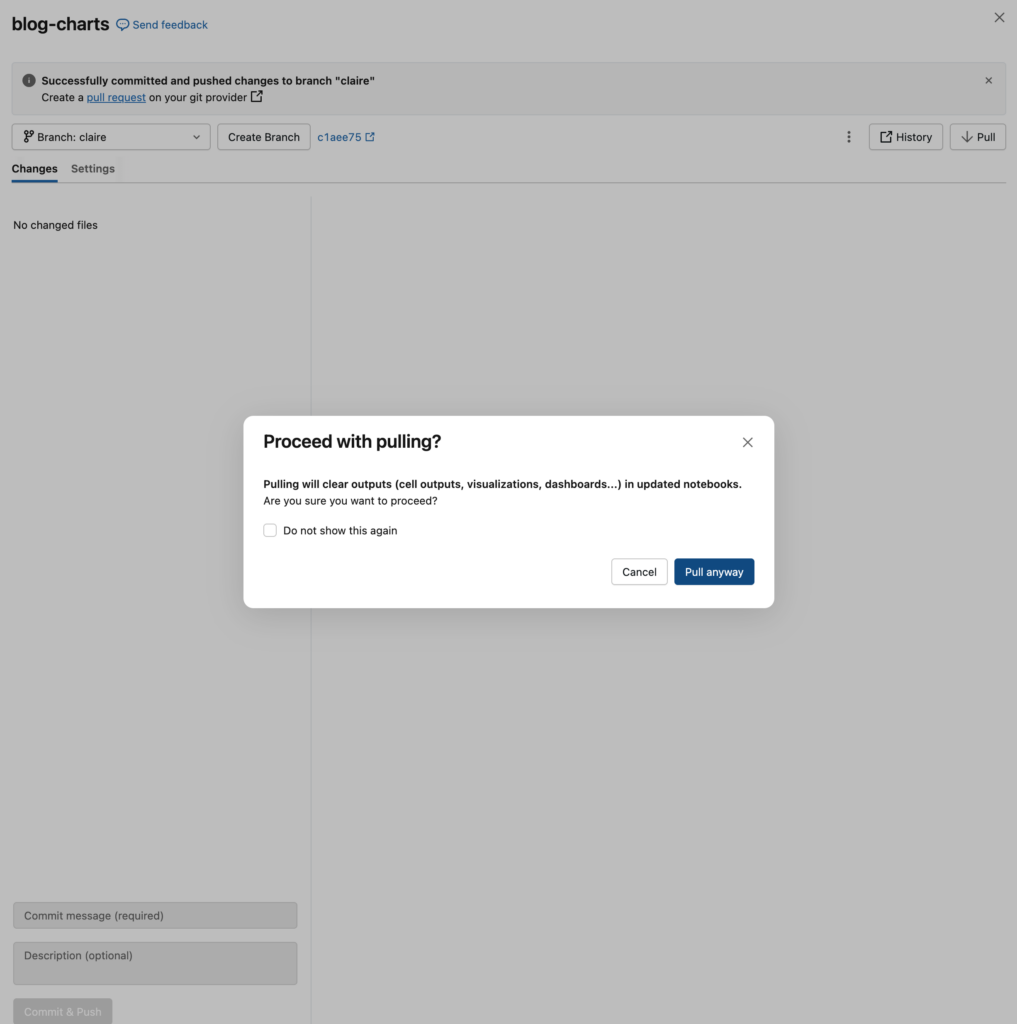
- click Pull so your workspace matches the latest version of that branch on GitHub
This is a different direction from Step 5.
- In Step 5, you merge your branch into
dev - In Step 6, you bring
devinto your branch
That is an important distinction. Step 5 is about merging your finished work into the shared branch. Step 6 is about keeping your branch current while you are still working.
A good habit is to sync your branch regularly, especially before opening a Pull Request or after other changes have landed in dev.
Reverting changes safely
Everyone makes mistakes. The important thing is knowing which type of mistake you made.
If you changed a file but have not committed yet, you can usually discard the local changes and return the file to the last committed version.
If you already committed or pushed the mistake, the safest beginner-friendly approach is usually to make a new commit that undoes it, rather than trying to rewrite history.
If the change has already been merged into dev or main, do not reset the shared branch. Revert it through a new commit or pull request so the history stays clear and auditable.
A simple rule is:
- not committed yet → discard changes
- committed or pushed on your branch → make a new undo commit
- already merged into shared branches → revert through pull request or GitHub
What if you hit a merge conflict?
A merge conflict means Git found overlapping changes in your branch and dev and cannot decide which version to keep automatically. This is normal. It does not mean Git is broken. A merge conflict is Git asking you to choose the final version of a file.
When this happens:
- Merge the latest
devinto your branch. - Open each conflicted file.
- Decide what the final version should be: keep your change, keep the
devchange, or combine both. - Delete the conflict markers.
- Rerun the affected code.
- Commit and push the resolved file.
Conflict markers look like this:
<<<<<<< HEAD
your version
=======
dev version
>>>>>>> dev
Common mistakes:
- keeping both versions without checking the logic
- deleting code without understanding it
- forgetting to rerun the code after resolving the conflict
- waiting too long to sync with
dev